
Deep Dive into the Max for Live Vector Grain Audio Effect
Introduction
Max for Live, the dynamic platform for audio and MIDI effects and instruments within Ableton Live, continues to expand the creative possibilities for musicians and sound designers. Among its innovative offerings, the Max for Live Vector Grain Audio Effect stands out as a powerful tool for crafting intricate and evolving granular textures within your music production. In this blog post, we'll dive deep into the world of the Max for Live Vector Grain Audio Effect, exploring its features, applications, and how you can unleash its creative potential.

What is the Vector Grain Audio Effect?
The Max for Live Vector Grain Audio Effect is a cutting-edge granular processing tool that goes beyond traditional granular synthesis. It leverages a 2D grid called the "Vector Field" to manipulate grains of sound in real-time. Each grid cell represents a position in the stereo field, and within each cell, you can manipulate parameters like pitch, time, and more. This results in highly dynamic and spatially expressive granular textures.
Key Features of the Vector Grain Audio Effect
1. Vector Field Interface
The heart of the Vector Grain Audio Effect is the Vector Field, a visual representation of the stereo field where you can place and manipulate grains. This grid allows for precise positioning and movement of grains, enabling complex spatial soundscapes.
2. Grain Manipulation
Pitch: You can individually control the pitch of each grain, allowing for melodic and harmonic exploration within your granular textures.
Time: Adjust the playback speed of grains to create time-stretching or time-compression effects, adding rhythmic diversity to your textures.
Density: Define the density of grains within each cell of the Vector Field, varying from sparse to dense textures.
Position: Shift grains within a cell to modulate their spatial position within the stereo field, creating immersive auditory experiences.

3. Envelopes and Modulation
The Vector Grain Audio Effect integrates seamlessly with the Max for Live Envelope section, enabling you to modulate various parameters over time. You can create evolving textures by automating grain properties, introducing dynamic movement and depth to your soundscapes.
Applications in Music Production
1. Evolving Soundscapes
The Vector Grain Audio Effect is perfect for crafting evolving soundscapes that transform and breathe over time. By automating parameters such as pitch, density, and position, you can create cinematic textures that evolve and captivate your listeners.
2. Rhythmic Textures
Experiment with the Vector Field to generate rhythmic textures that sync with your project's tempo. Varying grain density and time manipulation can lead to intricate and syncopated patterns, enhancing your rhythm sections.
3. Spatial Sound Design
The Vector Field's spatial control allows you to position grains precisely within the stereo field. This feature is invaluable for creating 3D sound design elements that immerse your audience in a spatial audio experience.
How to Use the Vector Grain Audio Effect
Insert the Effect: Load the Max for Live Vector Grain Audio Effect onto an audio track in Ableton Live.
Explore the Vector Field: Familiarize yourself with the Vector Field interface. Click within the cells to place grains and adjust their parameters.
Experiment with Automation: Use the Max for Live Envelopes to automate grain properties over time. This is where you can create evolving and dynamic textures.
Layer and Blend: Don't hesitate to use multiple instances of the Vector Grain Audio Effect on different tracks. Layering and blending various textures can lead to rich and complex soundscapes.
Sample Selection Tab

Sample Loading: Start by loading your desired audio sample into the Vector Grain Audio Effect. This is the source material that will be granulated and manipulated to create your textures. Experiment with various types of audio content, from field recordings to synth sounds, to explore the full potential of granular synthesis.
Sample Position: You can precisely select the start and end points of the sample that will be used for granulation. This control enables you to focus on specific segments of the audio, emphasizing particular sonic characteristics or moments within the sample.
The "Show Grain Parameters" Tab: Fine-Tuning Granular Manipulation

In the Max for Live Vector Grain Audio Effect, the "Show Grain Parameters" tab plays a crucial role in shaping and refining your granular textures. This tab provides in-depth control over the behavior and characteristics of individual grains, allowing you to sculpt intricate and expressive soundscapes. Let's dive into the key features and practical tips for using the "Show Grain Parameters" tab effectively:
Grain Parameters Control
Grain Start Position: The "Grain Start Position" parameter enables you to pinpoint the exact position within the sample where each grain begins. This level of precision allows you to emphasize specific moments or timbral elements in your audio source.
Grain Duration: Adjust the "Grain Duration" parameter to determine how long each individual grain persists in time. Longer durations create smoother and sustained textures, while shorter durations result in more fragmented and percussive sounds.
Grain Pitch: The "Grain Pitch" control allows you to manipulate the pitch of individual grains independently. This feature is essential for creating melodic or harmonic granular textures within your compositions.
Grain Pan: Precisely position individual grains in the stereo field using the "Grain Pan" parameter. This control is invaluable for achieving spatially dynamic and immersive soundscapes.
Grain Volume: Adjust the "Grain Volume" parameter to control the amplitude of individual grains. Careful manipulation of grain volumes can shape the overall dynamics and intensity of your granular textures.
Modulation and Envelopes
Envelope Integration: As with other sections of the Vector Grain Audio Effect, the "Show Grain Parameters" tab can be integrated with the Max for Live Envelopes. This allows you to modulate grain parameters such as Grain Start Position, Duration, Pitch, Pan, and Volume dynamically over time, opening up endless creative possibilities for evolving textures.
Practical Tips for Using the "Show Grain Parameters" Tab
Precision in Grain Position: Use the "Grain Start Position" parameter to pinpoint specific moments or elements within your audio source. This level of precision can result in granular textures that emphasize key elements in your composition.
Experiment with Grain Duration: Adjust the "Grain Duration" parameter to explore a wide range of textures, from sustained and evolving soundscapes to percussive and rhythmic patterns.
Melodic Granulation: Manipulate the "Grain Pitch" parameter to create melodic or harmonic elements within your granular textures. This is particularly effective when you want to introduce tonal or musical qualities to your compositions.
Spatial Placement: Use the "Grain Pan" control to position individual grains within the stereo field. This spatial control can add depth and dimension to your granular soundscapes, creating an immersive auditory experience.
Dynamic Modulation: Combine envelope modulation with adjustments to grain parameters for dynamic and evolving granular textures. Automation over time can introduce movement and complexity to your compositions.
The "Show Force Settings" Tab: Shaping Granular Movement and Dynamics
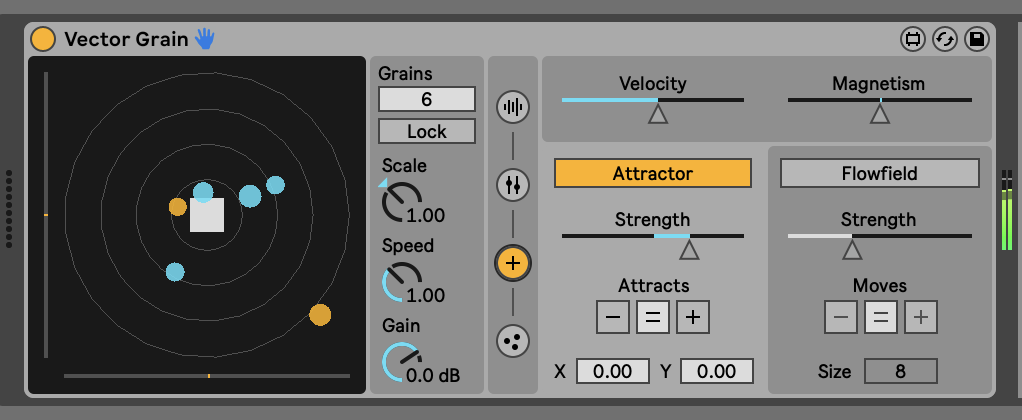
In the Max for Live Vector Grain Audio Effect, the "Show Force Settings" tab plays a pivotal role in sculpting the movement, dynamics, and spatial characteristics of your granular textures. This tab offers detailed control over forces that influence the behavior of individual grains within the Vector Field, allowing you to craft complex and dynamic soundscapes. Here's a closer look at the key features and practical tips for using the "Show Force Settings" tab effectively:
Force Parameters Control
Gravity: The "Gravity" parameter introduces a gravitational force that affects the movement of grains within the Vector Field. Positive values cause grains to be pulled downward, while negative values push them upward. Experimenting with gravity can create vertical movement and dynamics in your granular textures.
Wind X and Wind Y: The "Wind X" and "Wind Y" parameters represent horizontal wind forces that influence the grains' movement along the X and Y axes of the Vector Field. Adjusting these parameters can produce lateral shifts and create spatial movement within your audio.
Force Speed: The "Force Speed" parameter controls the overall speed at which forces influence grain movement. Higher values result in faster and more dynamic changes, while lower values create a slower and more gradual impact.
Force Spread: Modify the "Force Spread" parameter to determine the area of influence for forces. Larger spread values lead to more widespread effects, while smaller values concentrate forces within a specific region of the Vector Field.
Modulation and Envelopes
Envelope Integration: Similar to other sections of the Vector Grain Audio Effect, the "Show Force Settings" tab can be integrated with the Max for Live Envelopes. This enables you to modulate force parameters, such as Gravity, Wind X, Wind Y, Force Speed, and Force Spread, over time, resulting in evolving and dynamic granular textures.
Practical Tips for Using the "Show Force Settings" Tab
Dynamic Movement with Gravity: Experiment with positive and negative gravity values to introduce dynamic vertical movement to your granular textures. Positive values can create downward movement, while negative values produce upward movement, enhancing the sense of space and motion.
Lateral Movement with Wind: Adjust the "Wind X" and "Wind Y" parameters to influence horizontal movement within the Vector Field. This lateral movement can add a spatial dimension to your granular textures, allowing grains to drift across the stereo field.
Speed Control: Use the "Force Speed" parameter to control the overall speed of force-induced movements. Higher values can result in rapid and dramatic shifts, while lower values offer a slower and more subtle influence.
Focused Forces with Spread: Experiment with the "Force Spread" parameter to control the area over which forces have an effect. Smaller spread values concentrate forces, creating localized and nuanced movements, while larger values result in more widespread shifts.
Envelope Modulation: Combine envelope modulation with adjustments to force parameters for dynamic and evolving granular textures. Automation over time can introduce movement, depth, and complexity to your compositions.
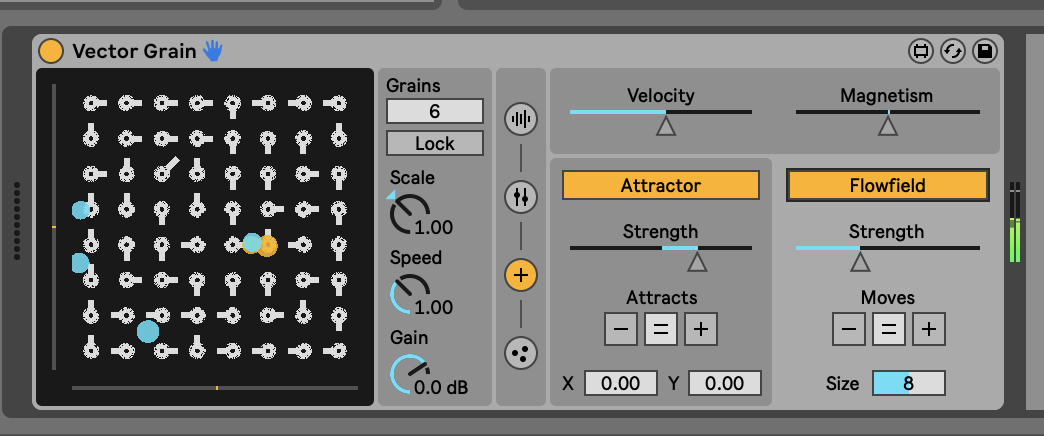
The "Show Particle Settings" Tab: Adding Complexity to Granular Textures

In the Max for Live Vector Grain Audio Effect, the "Show Particle Settings" tab is a crucial component that enables you to introduce complexity, motion, and variation to your granular textures. This tab allows you to define how particles move through the Vector Field, interact with grains, and shape the overall sonic character of your composition. Here's a closer look at the key features and practical tips for using the "Show Particle Settings" tab effectively:
Particle Parameters Control
Particle Density: The "Particle Density" parameter controls the number of particles generated within the Vector Field. Higher density values result in a denser and more intricate texture, while lower values create sparser and more spacious soundscapes.
Particle Speed: Adjust the "Particle Speed" parameter to control the velocity at which particles move through the Vector Field. Higher speeds introduce rapid and dynamic motion, while lower speeds create a slower and more contemplative texture.
Particle Size: The "Particle Size" parameter defines the size of individual particles. Larger sizes produce more pronounced and sustained sonic interactions, while smaller sizes lead to subtle and fleeting particle effects.
Particle-Grain Interaction
Particle-Grain Interaction: The "Particle-Grain Interaction" parameter determines how particles interact with grains within the Vector Field. You can choose between "Attract," "Repel," and "None."
"Attract" causes particles to be drawn toward grains, creating a sense of cohesion and convergence in the texture.
"Repel" pushes particles away from grains, resulting in a dispersed and scattered texture.
"None" disables particle-grain interaction, allowing particles to move freely without being affected by grains.
Modulation and Envelopes
Envelope Integration: Just like other sections of the Vector Grain Audio Effect, the "Show Particle Settings" tab can be integrated with Max for Live Envelopes. This enables you to modulate particle parameters, such as Particle Density, Particle Speed, Particle Size, and Particle-Grain Interaction, over time, offering dynamic and evolving granular textures.
Practical Tips for Using the "Show Particle Settings" Tab
Texture Density Control: Adjust the "Particle Density" parameter to control the texture density. Higher densities create more intricate and complex textures, while lower densities lead to spacious and contemplative sonic environments.
Motion and Velocity: Experiment with the "Particle Speed" parameter to introduce motion and velocity to your granular textures. Varying speeds can result in dynamic and evolving sonic movement within your compositions.
Sonic Character with Particle Size: The "Particle Size" parameter influences the sonic character of particle-grain interactions. Larger sizes can create sustained and pronounced effects, while smaller sizes produce subtle and fleeting nuances.
Interaction Choice: Explore different interaction modes, such as "Attract" and "Repel," within the "Particle-Grain Interaction" parameter to shape the spatial behavior of particles. Choosing the right interaction mode can significantly impact the texture and movement of your composition.
Envelope Modulation: Combine envelope modulation with adjustments to particle parameters for dynamic and evolving granular textures. Automation over time can introduce complexity, depth, and motion to your music.
Conclusion
The Max for Live Vector Grain Audio Effect is a game-changer in granular processing, offering a unique and visually intuitive approach to sound manipulation. Its spatial control, automation capabilities, and dynamic grain manipulation make it a versatile tool for music producers, sound designers, and experimental artists. Dive into the world of the Vector Grain Audio Effect, explore its creative possibilities, and elevate your music production to new heights by crafting intricate and immersive sonic textures.