
Unleash the Power of Your Drums: A Comprehensive Guide to Ableton's Drum Buss Effect
Introduction
Ableton Live is a renowned digital audio workstation (DAW) for electronic music production, and it comes packed with a plethora of powerful tools to shape and enhance your sound. One such gem in Ableton's arsenal is the Drum Buss effect. This effect can transform your drum tracks from ordinary to extraordinary, adding punch, warmth, and character. In this comprehensive guide, we'll explore how to use Ableton's Drum Buss effect to elevate your drum sound.
Understanding the Drum Buss Effect
Before we dive into the practical aspects, let's understand what the Drum Buss effect does:
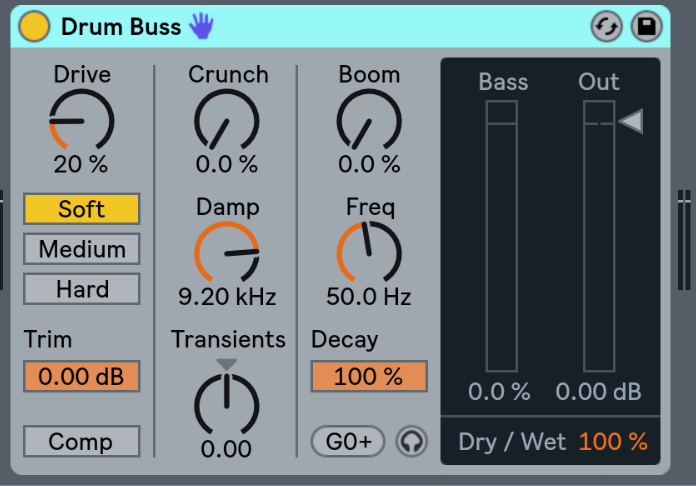
The Drum Buss is a dedicated audio effect designed for processing drum tracks, but it's not limited to drums. It combines multiple processes in one device to sculpt your drum sound effectively. These processes include:
Compression: Drum Buss features a built-in compressor to enhance dynamics and control the transients in your drum sound.
Drive: This parameter adds harmonically rich saturation to your drums, adding warmth and character.
Transient Shaping: You can sharpen or soften the attack and release of your drums, allowing for more control over the sound's punch.
Low-End Enhancement: Drum Buss includes a dedicated low-end processing section for added weight and sub-frequency control.
Step-by-Step Guide: How to Use Ableton's Drum Buss Effect
Now, let's dive into the nitty-gritty of using the Drum Buss effect in Ableton Live.
Step 1: Apply the Drum Buss Effect
To use Drum Buss, follow these steps:
Insert an instance of Drum Buss on the drum track you want to process. You can do this by simply dragging and dropping it onto the track from Ableton's browser.
Once you've added the effect, you'll see the Drum Buss device interface with various controls.
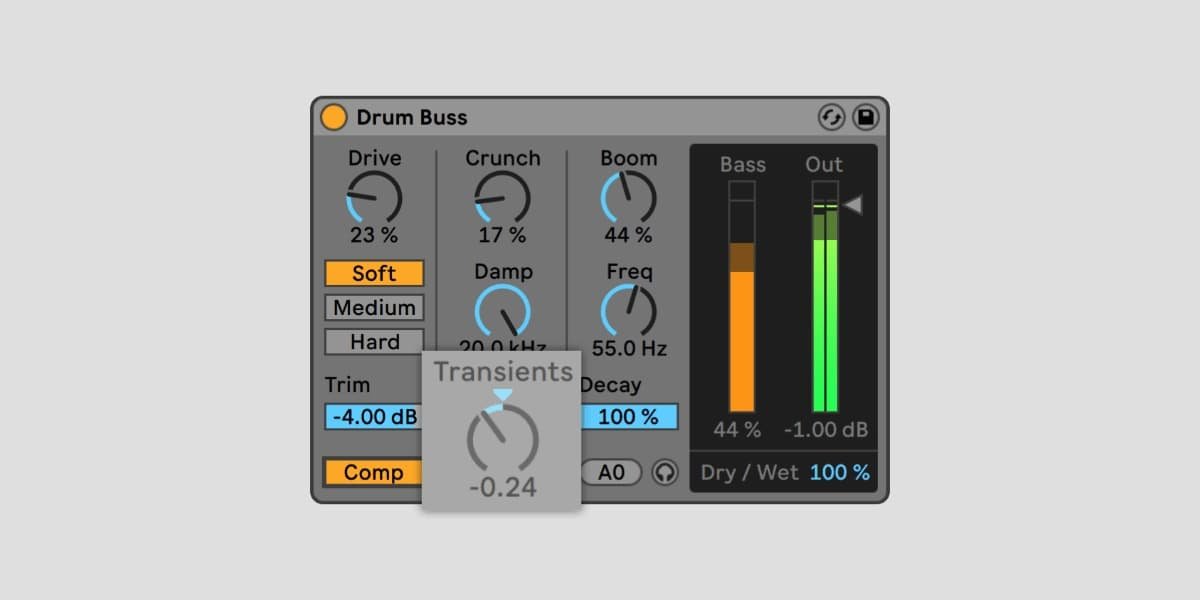
Step 2: Set the Compression
Compression is crucial in shaping the dynamics of your drums. Adjust the "Boom" and "Transients" knobs to control the compression.
Boom: This controls the amount of compression applied to the low frequencies. Turning it up will make your kicks and low-end punchier.
Transients: Adjust this to control the amount of compression applied to the transients. Increasing it will make the initial hits more pronounced.

Step 3: Add Saturation
The "Drive" knob introduces saturation to your drum sound. Saturation can add warmth and harmonics, enhancing the overall character of your drums. Start with subtle settings and increase gradually to taste.
Step 4: Transient Shaping
Drum Buss gives you control over the attack and release of your drums. Adjust the "Punch" and "Decay" knobs to achieve the desired transient shaping. "Punch" emphasizes the initial attack, while "Decay" affects the release phase. These settings can significantly impact the perceived punch and sustain of your drums.
Step 5: Low-End Enhancement
To control the low frequencies, use the "Low End" section. This includes a low-end saturator and a dedicated low-frequency compressor. Adjust these parameters to add weight and definition to your drum's low-end. Be cautious not to overdo it, as excessive processing can lead to muddiness.
Step 6: Blend to Taste
It's essential to maintain a balance between the dry and wet signal to ensure that the Drum Buss processing doesn't overwhelm the original drum sound. Use the "Drive" and "Output" knobs to control the level of the processed signal and adjust the "Dry/Wet" knob to blend the effect with the dry sound.
Step 7: Experimentation and Fine-Tuning
The key to using Drum Buss effectively is experimentation. There are no strict rules, and each drum track may require different settings. As you make adjustments, listen carefully to how each parameter affects your drums and tweak accordingly. Don't be afraid to push the boundaries and discover unique sounds.

Advanced Tips and Techniques
Here are some advanced tips and techniques to further harness the power of Ableton's Drum Buss effect:
Parallel Processing: Create a parallel processing chain by duplicating your drum track. Apply Drum Buss to one, and leave the other untouched. Blend the two to maintain the original dynamics while adding the processed punch and character.
Automation: Automate Drum Buss parameters over time to add movement and variation to your drum patterns. This can create engaging transitions and build-ups in your music.
Layering: Layer multiple instances of Drum Buss with different settings on various drum elements. For example, you can use one instance for kick processing and another for snare enhancement.
Use it on Other Instruments: While designed for drums, Drum Buss can be applied to other elements in your mix to add character and warmth. Try it on basslines, synths, or even vocals for creative sound design.
Conclusion
Ableton Live's Drum Buss effect is a versatile tool that can drastically improve the quality of your drum tracks and other audio elements. By understanding its core components and experimenting with its settings, you can sculpt your drum sound to fit your unique style and creative vision. Whether you're producing electronic, hip-hop, or any genre with drums, mastering the Drum Buss effect will undoubtedly be a valuable addition to your production toolkit. So, dive in, experiment, and watch your drum tracks come alive with punch, warmth, and character.