Understanding Gain Staging: The Backbone of Professional Audio Production
Gain staging is a fundamental concept that every sound engineer and producer must grasp to achieve professional-quality sound. This seemingly technical aspect of audio work is actually quite straightforward and immensely impactful on the final output. This comprehensive guide aims to demystify gain staging, explaining its importance, how it works, and practical steps to implement it effectively in your projects.
What is Gain Staging?
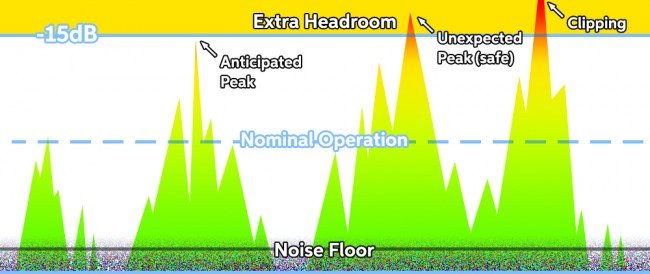
Gain staging is the process of managing the levels of audio signals as they pass through different components in the audio signal path, from input to output. The goal is to ensure that the signal is strong enough to be processed effectively without introducing noise or distortion at any stage. Proper gain staging allows for optimal use of your gear's dynamic range, resulting in cleaner, more dynamic recordings and mixes.
The Importance of Gain Staging
Why bother with gain staging? In both analog and digital domains, managing signal levels is crucial for a number of reasons:
Noise Reduction: Ensuring signals are above the noise floor of your gear avoids the amplification of noise in the signal chain.
Distortion Avoidance: Prevents clipping and unwanted distortion by keeping signals below the maximum headroom of your gear.
Optimal Use of Effects: Many plugins and outboard gear are designed to operate best at certain signal levels.
Improved Mix Headroom: Properly staged gains result in more headroom in your mix, allowing for a more dynamic and transparent final product.
Analog vs. Digital Gain Staging
Gain staging principles apply whether you're working in the analog or digital realm, but there are differences in how they're implemented and the consequences of getting it wrong.
Analog: In analog systems, a certain amount of signal "hotness" is often desirable to saturate tape or analog gear, adding harmonic content and warmth. However, too hot signals lead to unwanted distortion.
Digital: Digital systems have an absolute ceiling (0 dBFS) beyond which any signal will clip and distort unpleasantly. Unlike analog, there's no pleasing saturation to be gained from pushing levels too high in digital.
The Stages of Gain
Understanding the various stages where gain can be adjusted is crucial. Here are the main stages to consider:
Input Gain/Trim: The first gain stage, where the level of the incoming signal is set. This could be on a microphone preamp, an audio interface, or the initial gain setting in a DAW track.
Channel Faders: Used primarily for mixing rather than gain staging, but setting initial levels properly can reduce the need for drastic fader movements later.
Plugin Gain: Many processing plugins can affect the signal level. Adjust plugin input/output levels to ensure consistent levels throughout the signal chain.
Master Fader: The final volume control before the output. Ideally, this should be left at unity gain (0 dB) and not used to fix gain staging issues.
Practical Gain Staging Tips
Implementing effective gain staging requires a methodical approach. Here are some practical tips:
Aim for Consistent Levels: When recording or importing audio, aim for peak levels between -18 dBFS and -12 dBFS. This mirrors the "sweet spot" of analog gear and leaves ample headroom for mixing.
Monitor and Adjust Plugin Levels: After adding a plugin that affects volume, adjust its output to match the input level, ensuring no stage inadvertently increases the signal too much.
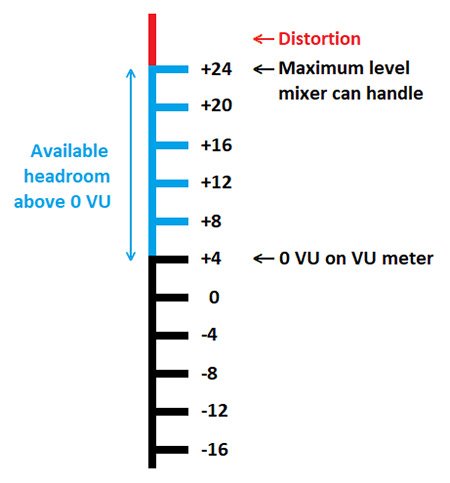
Use VU Meters for Visual Reference: VU meters can help maintain consistent levels across tracks. Aim for average levels around 0 VU, which typically corresponds to -18 dBFS in digital.
Be Wary of Cumulative Changes: Each added effect or process can alter the signal level. Regularly check your levels throughout the signal chain to prevent surprises.
Gain Staging in the Box: For purely digital projects, maintain awareness of your DAW’s headroom and the digital noise floor. Modern DAWs have a virtually inaudible noise floor, so focus on avoiding clipping.
Advanced Considerations
Automation and Gain Staging: Volume automation can affect gain staging. Apply automation after setting proper static levels for each track.
Buss and Group Tracks: Grouping tracks and routing them through busses can affect overall gain. Treat each bus as another stage in your gain staging process.
Export and Mastering: Leave headroom for the mastering process. A common recommendation is to keep your master fader peaking no higher than -6 dBFS before exporting for mastering.
The Role of Headroom in Mixing
Headroom is the space between the highest level of your signal and the maximum level your system can handle before clipping. Adequate headroom is essential for dynamic content to breathe and for avoiding digital clipping. A well-gain-staged mix will naturally have more headroom, which is especially crucial during the mixing and mastering phases where dynamics are finely balanced and polished.
Mastering the Art of Listening
An often-overlooked aspect of gain staging is developing your listening skills. Being able to hear when a signal is too hot and clipping or too low and getting lost in the noise floor is critical. Train your ears by comparing how different levels affect the sound quality, warmth, and clarity of your recordings. Over time, you'll develop an intuitive sense for how to set levels properly by ear, in conjunction with visual meters.
Digital Gain Staging: A Deeper Dive
In the digital domain, gain staging takes on added nuances due to the binary nature of digital audio. A common misconception is that digital audio lacks the warmth of analog due to its precision. However, this precision allows for a clearer preservation of the original signal, provided gain staging is correctly managed to avoid digital clipping.
Normalized Levels: Beware of normalizing tracks without considering the context of the entire mix. Normalization can push levels closer to clipping, reducing headroom unnecessarily.
Bit Depth and Headroom: Understanding bit depth is crucial in digital audio. Higher bit depths increase the dynamic range, making careful gain staging even more essential to take full advantage of the available headroom without introducing noise.
Gain Staging with Virtual Instruments
Virtual instruments (VIs) can output at various levels depending on their internal settings. When integrating VIs into your projects:
Check VI Output Levels: Before recording or bouncing virtual instrument tracks, check their output levels to ensure they align with your target levels for digital audio (-18 dBFS to -12 dBFS peak).
Adjust Within the VI: Many virtual instruments allow you to adjust output levels from within the instrument itself. Use this feature to prevent overly hot signals from entering your DAW at the source.
Mixing with Headroom in Mind
When mixing, the goal of gain staging shifts slightly towards maintaining clarity and dynamic range. Each added EQ boost, compression, or effect can alter the track's overall level. Consistent revisiting and adjusting of levels ensure that no single track or bus overwhelms the mix or pushes the master bus into clipping.
Static Mix Levels: Start your mix with faders at unity (0 dB) and adjust levels to achieve a balanced static mix. This approach makes it easier to identify which tracks need gain adjustments.
Compression and Gain Staging: Compression reduces dynamic range, affecting perceived loudness. Use makeup gain wisely to bring the signal back to its original level post-compression without overshooting.
Final Thoughts
Gain staging is more than a set of technical steps; it's a mindset that prioritizes clarity, dynamic expression, and the integrity of the audio signal from start to finish. By adhering to gain staging principles, you ensure that each element in your mix has the space to shine, free from noise and distortion. This not only makes your mixes sound professional but also makes the mixing process more enjoyable and creative.
Embrace gain staging as an essential part of your workflow. Experiment with different levels to see how they affect your sound, and remember, the goal is always to serve the music. With practice and attention to detail, you'll find that proper gain staging is the key to unlocking the full potential of your productions, leading to cleaner, more dynamic, and more engaging audio works.


