
How to Produce your First Rap or Hip Hop Beat in Ableton Live
Creating your first rap beat in Ableton Live can be an exciting venture into music production, especially with Ableton's user-friendly interface and powerful tools. Whether you're an aspiring music producer or a seasoned musician exploring rap and hip-hop, this guide will walk you through the fundamental steps to craft a compelling rap beat, even as a beginner.
Getting Started with Ableton Live
Before diving into the creation process, ensure you have Ableton Live installed on your computer. Ableton Live comes in several versions (Intro, Standard, and Suite), each offering different features. For beginners, Ableton Intro is a great starting point, as it provides all the necessary tools without overwhelming you with too many options.

Step 1: Set Up Your Project
1. Launch Ableton Live
When you first open Ableton Live, you’ll be greeted with a default set or you can choose to start a new project. Familiarize yourself with the interface if you haven't already. The main areas to note are the Session View, which is great for improvising and playing with musical ideas, and the Arrangement View, where you can lay out your tracks along a timeline.
2. Configure Audio Settings
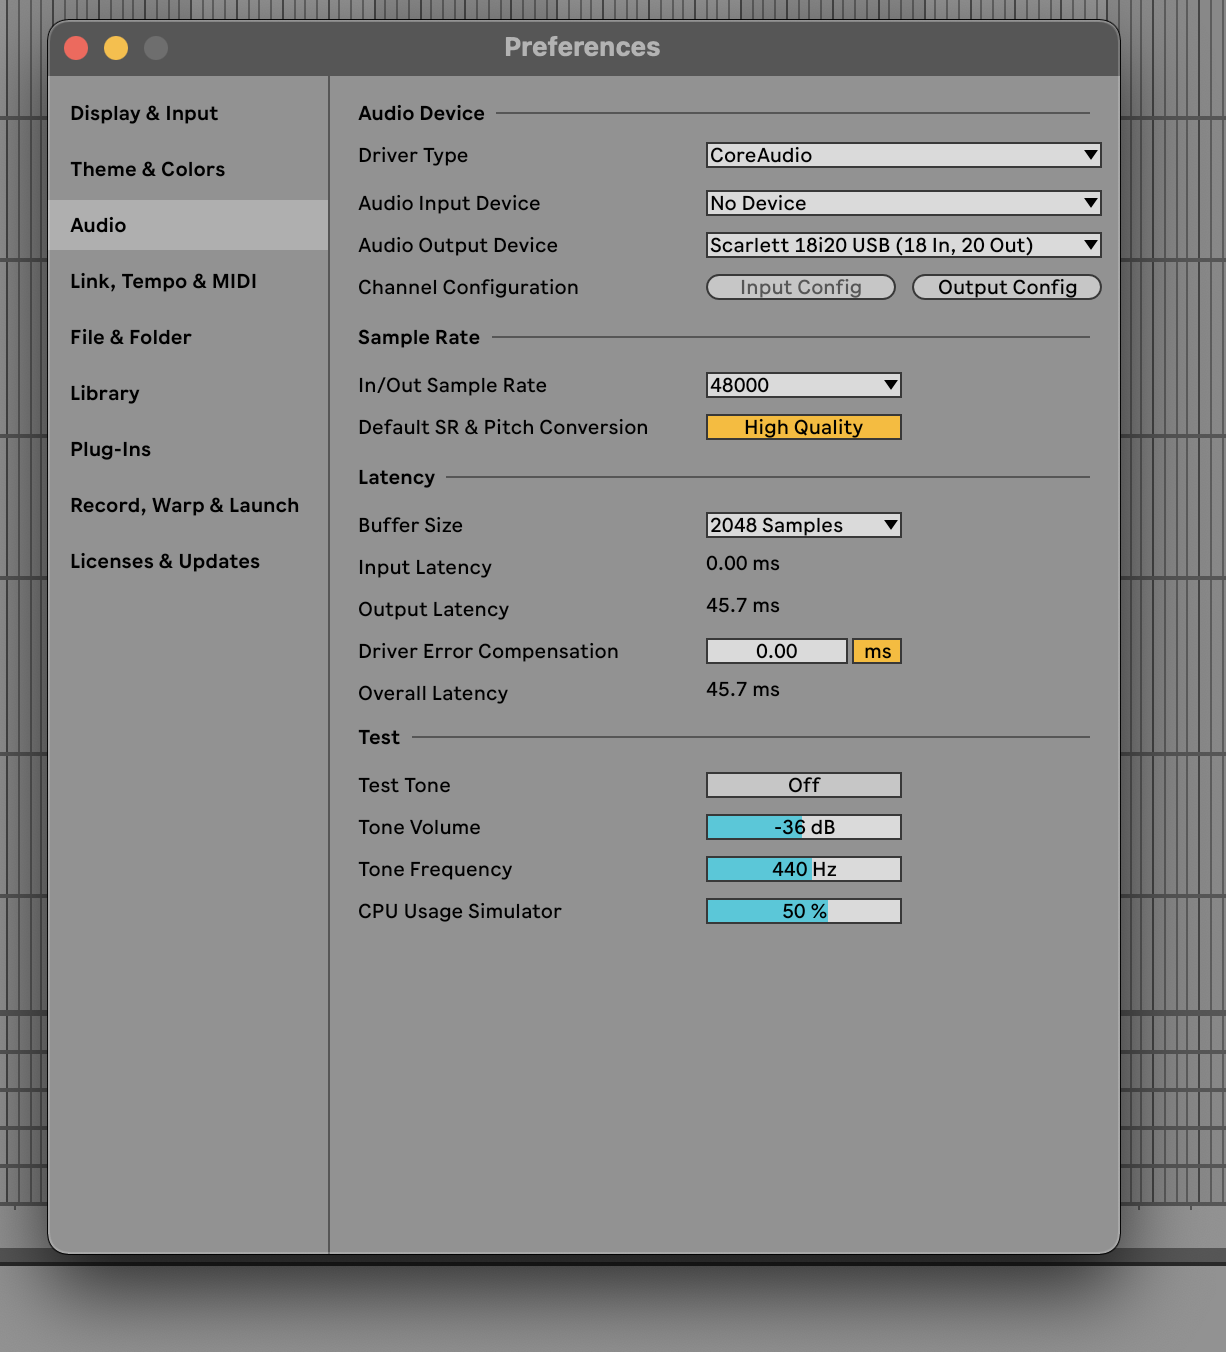
Before you start creating, make sure your audio settings are correctly configured to ensure smooth operation. Go to 'Preferences' under the 'Options' menu and select the 'Audio' tab. Here you can set your:
Driver Type: Choose ASIO for Windows or Core Audio for Mac for the best performance.
Audio Device: Select your audio interface or computer’s sound card.
Input and Output Configuration: Enable the appropriate inputs and outputs for your setup.
3. Set the Project Tempo
Set the BPM (Beats Per Minute) for your project, which is crucial in defining the rhythm and pace of your beat. For rap music, tempos typically range between 75 to 100 BPM. To adjust the tempo, you can manually type in a value in the tempo box located at the top left of Ableton’s interface or drag up or down on the tempo value to adjust it dynamically.
4. Choose the Time Signature

Rap usually sticks to a 4/4 time signature, but you can experiment with different time signatures depending on the feel you want for your beat. The time signature can be adjusted next to the tempo field.
5. Save Your Project
It’s a good habit to save your project early and keep saving regularly. Go to 'File' and select 'Save Live Set As...' Choose a location on your computer that’s easy to access, and give your project a name that you’ll remember.
6. Organize Your Browser
Ableton’s browser is where all your instruments, effects, samples, and plugins are located. Take some time to familiarize yourself with where everything is. You can drag and drop any of these elements into your project. Setting up a few collections (customized tabs in the browser) for your most used tools or sounds can speed up your workflow.
By setting up your Ableton Live project correctly, you ensure that everything else in the music creation process flows more smoothly. Proper initial setup helps in reducing technical interruptions, allowing you to focus more on the creative aspects of producing your rap beat.
Step 2: Choose Your Sounds
1. Accessing Sounds
Ableton Live comes packed with a wealth of samples and instruments that you can use to start building your beat. To access these, navigate to the ‘Browser’ on the left side of the screen. You’ll find a variety of sounds under ‘Drums’, ‘Instruments’, and ‘Samples’. For a typical rap beat, you'll need to focus on selecting quality drum sounds and other complementary instruments.

2. Selecting Drum Sounds
Kick Drum: The kick is the heartbeat of your track. Look for a kick that is deep and punchy. It should stand out without overpowering other elements. In Ableton, you can find a good selection under ‘Drums’ in the ‘Drum Rack’ presets.
Snare Drum: The snare provides the backbeat and often characterizes the feel of the track. Choose a snare that snaps or claps sharply, cutting through the mix. Snares can be found alongside kicks in the drum kits, or you can use single samples to create a custom snare sound.
Hi-Hats: Hi-hats add rhythm and pace to your beat. You might want both closed and open hi-hat sounds to vary the texture. These are also available in the Drum Rack presets or as individual samples.
3. Adding a Bassline
Bass Sounds: The bassline should complement your drumbeat and can either be synthesized or sampled. Ableton's built-in instruments like ‘Operator’ or ‘Analog’ provide powerful synthesis options to create custom bass sounds. For a more natural bass sound, consider using sampled basslines which can be found under ‘Samples’ or through Ableton’s ‘Simpler’ sampler instrument.
4. Choosing Melodic and Harmonic Elements
Keys and Synths: For harmonic and melodic layers, explore the ‘Instruments’ section. Using instruments like ‘Wavetable’ or ‘Electric’ (for electric piano sounds) can add mood and atmosphere to your beat.
Samples: Don’t overlook the power of samples for adding unique elements to your track. Samples can be vocal chops, stabs, or loops that add flair and originality to your production. Use Ableton’s ‘Simpler’ or ‘Sampler’ to manipulate these sounds to fit your track.
5. Utilizing Audio Effects
Effect Racks: Once you have your basic elements loaded into your tracks, consider using Ableton’s audio effects to enhance and shape your sounds. Effects like ‘Reverb’ can add space to snares or hi-hats, while ‘Compressor’ can help glue your kick and bass together.
Filters and EQ: Use ‘Auto Filter’ or ‘EQ Eight’ to sculpt your sounds, removing unnecessary frequencies and enhancing those that contribute most to the feel of the beat.
6. Experimenting with Sound
Layering: Often, layering two or more sounds can create a richer, fuller sound. Try layering two different kick drums to create a unique sound or a snare and a clap for a more impactful backbeat.
Tuning Your Drums: Make sure your drums are in tune with the rest of your track. You can tune your drums using Ableton’s ‘Transpose’ function or manually tuning samples in ‘Simpler’.
Choosing the right sounds is about experimentation and feeling. Spend time playing with different combinations and see what resonates with the vibe you’re aiming for. The great thing about Ableton Live is the ease with which you can swap out sounds and try new things without disrupting your workflow, making it an ideal playground for crafting your perfect rap beat.
Step 3: Create a Drum Pattern

1. Setting Up a Drum Rack
Ableton Live’s Drum Rack is a powerful tool for assembling your drum kits. To start, drag a Drum Rack onto a new MIDI track from the 'Instruments' section of the Browser. Once it’s loaded, you can drag and drop individual drum samples (like kicks, snares, and hi-hats) into the slots.
2. Programming Your Beat
Kick Pattern: Start by laying down your kick drum pattern. In rap, the kick often hits on the downbeats, which are typically the 1st and possibly the 3rd beats of each measure. However, feel free to experiment with placements to give your beat a unique groove.
Snare Pattern: Snares generally fall on the 2nd and 4th beats of each bar, providing a steady backbeat. You can add ghost snare hits at lower velocities in between the main snare hits for a more complex rhythm.
Hi-Hat Pattern: Begin with a simple pattern, placing closed hi-hat hits on each eighth note or even each quarter note. Then, add variations by including open hi-hats, creating rolls, or changing velocities to enhance the rhythm and feel.
3. Utilizing MIDI Editor for Precise Control
Open the MIDI clip by double-clicking on it in the Arrangement View or Session View. Here, you can manually draw in your notes or use a MIDI controller to perform your drum pattern. Ableton’s MIDI editor allows you to adjust the timing, velocity (which affects the volume and attack of the note), and duration of each note.
4. Experimenting with Grooves
To give your beat a more natural, less robotic feel, experiment with Ableton’s Groove Pool. Drag a groove from the Groove Library onto your drum clip to apply a swing or shuffle feel, which can make the pattern more dynamic. You can adjust the intensity of the groove using the ‘Amount’ slider in the Groove Pool.

5. Fine-Tuning and Layering
Layering Sounds: For a fuller sound, consider layering different drum samples on top of each other. For example, layer a clap with your snare on every second or fourth beat.
Fine-Tuning Samples: Use Ableton’s built-in controls to shape each drum sound. Adjust the start and end points of samples, tweak the ADSR (Attack, Decay, Sustain, Release) envelope, and apply filters directly within the Drum Rack to tailor each sound to your liking.
6. Adding Variation
To keep the listener engaged, add variations to your drum pattern, especially in different sections of your track (e.g., verse, chorus). Alter the hi-hat pattern, introduce new percussion elements like shakers or tambourines during a chorus, or change the kick pattern to increase energy at different points in the song.
7. Utilizing Effects
Finally, consider adding effects directly to the Drum Rack or to individual drum samples. Common effects for drums in rap include reverb on snares for added space, saturation on kicks for warmth, and compression on the entire drum bus to glue the sounds together.
Creating a compelling drum pattern is both an art and a science, involving creativity in rhythm and precision in technical settings. Spend time experimenting with different patterns, sounds, and effects to discover what best serves the song you are creating. This exploratory phase is key to developing your unique sound as a producer.
Step 4: Add a Bassline
1. Selecting a Bass Sound

Start by choosing the right bass sound. Ableton offers a range of options:
Synth Bass: Use Ableton’s built-in synthesizers like 'Operator' or 'Analog' for electronic bass sounds. These can be highly customizable and are great for crafting a unique bassline.
Sampled Bass: If you prefer a more natural bass guitar sound, you can opt for a sampled bass from Ableton’s library or third-party samples. 'Simpler' or 'Sampler' instruments are perfect for playing back these samples.
Sub Bass: For deeper, low-end focused tracks, a sub-bass can be crucial. You can create one using a sine wave from a synthesizer like Operator, which provides a smooth and deep bass tone.
2. Creating a MIDI Track
Once you’ve selected your bass sound, create a new MIDI track in your project. Drag your chosen instrument or sample onto this track.
3. Programming the Bassline
Complement the Kick: Start by listening to your drum track and identifying where the kick hits. A common technique in rap is to align bass notes with kick drum hits to reinforce the rhythm and create a cohesive groove.
Simple Patterns: Especially for beginners, it's effective to start with a simple pattern that plays on the downbeats or follows a straightforward rhythmic pattern. You can gradually add syncopation or additional notes as you get more comfortable.
Use Scales: To ensure your bassline harmonically matches the rest of your track, stick to a specific scale or key. Minor scales often work well for rap and hip-hop tracks, providing a moody and intense feel.
4. Editing MIDI Notes
Open the MIDI clip in the editor by double-clicking on it. You can now place, move, and delete notes to shape your bassline. Experiment with different lengths and velocities of notes to add dynamics and interest.

5. Applying Effects
Once your basic bassline is in place, you can enhance it with effects:
EQ: Use EQ Eight to cut off any high frequencies to ensure the bass doesn’t interfere with other elements like vocals or hi-hats. Boosting certain low-end frequencies can help your bass cut through on smaller speakers.
Compression: Applying a compressor can help level out the dynamics of the bassline, making it more consistent in volume. Side-chaining the compressor to the kick drum can also create a pumping effect, typical in many rap tracks.
Saturation or Overdrive: Adding a bit of saturation or overdrive can add warmth and presence to the bass, making it feel more alive.
6. Fine-Tuning the Groove
Adjust the timing and groove of your bassline to perfectly match with your drums. You might want to slightly delay the onset of your bass notes to create a laid-back feel or synchronize them tightly with the drums for a more driving beat.
7. Automation
For added interest, automate parameters like filter cutoff, resonance, or volume throughout your track. Automation can help your bass evolve over time, maintaining listener interest and building tension throughout different sections of your beat.
Step 5: Layer Additional Instruments
1. Choosing Instrumental Elements
To start, consider what kind of additional elements might complement your beat:
Keys and Synths: Pianos, electric pianos, and synthesizers are excellent for adding chords and melodies. They can provide both rhythmic patterns and sustained harmonies to support the groove.
Strings and Pads: These can add a dramatic flair or smooth out the sound with sustained notes that fill up the sonic space.
Leads and Samples: Lead synths or sampled melodic loops can define the main theme of your track. They should be catchy and memorable, often playing a hook or a riff.
Guitar and Other Instruments: Depending on the style and mood you’re aiming for, incorporating guitars, brass, or other instruments can add a unique character to your rap beat.
2. Creating the Tracks
For each new instrument you decide to add:
Create a New MIDI Track: If you’re using MIDI instruments, create a new track for each to keep your project organized.
Use Audio Tracks for Samples: For pre-recorded loops or live recordings, use audio tracks.
3. Programming or Recording
MIDI Instruments: If you’re using MIDI, input notes using a MIDI controller or draw them directly into the MIDI clip editor. Experiment with different chord progressions, basslines, and melodic lines until you find something that complements the beat.
Audio Samples: Drag and drop samples into the timeline. Adjust their timing and pitch if necessary to make sure they’re in key and rhythm with the rest of the track.
4. Applying Effects

To blend these new elements into your track smoothly:
Reverb and Delay: These can be used to create space and depth, especially useful on leads, keys, and pads.
EQ: Each instrument should have its own space in the frequency spectrum. Use EQ to cut unnecessary frequencies and avoid muddying your mix.
Compression: Use light compression to maintain consistent levels on dynamic instruments like pianos and guitars.
5. Layering and Texturing
Layering Sounds: Combine similar instruments playing different octaves or rhythms to create a fuller sound. For instance, layer a synth pad with a string section to enrich the background atmosphere.
Dynamic Textures: Use automation to bring instruments in and out of the mix, creating a dynamic arrangement that evolves over time.
6. Tweaking the Mix
Pan Positions: Spread out your instruments in the stereo field to avoid clashes and to create a wide, engaging mix.
Volume Levels: Adjust the volume faders to ensure that no instrument overwhelms the others. The key is to achieve a balanced sound where each element complements the others.
7. Checking the Fit
Regularly toggle each new track on and off to check how it affects the overall feel of the beat. Each addition should enhance the track without making it feel overcrowded or sonically cluttered.
Step 6: Arrange Your Beat
1. Understanding Common Structures

Rap songs typically follow a structure that might include the following sections:
Intro: Sets the tone and introduces elements of the beat.
Verse: The main section where the rapper delivers most of their lyrics. This is usually less dense musically to leave room for vocals.
Chorus (or Hook): A catchier, more repetitive section that contrasts with the verse.
Bridge: Optional, but can be used to add variation and lead into the final chorus or outro.
Outro: Closes out the song, sometimes fading out or ending abruptly for impact.
2. Laying Out the Basic Structure
Start by mapping out these sections in Ableton Live’s Arrangement View. You can use locators to mark where each section begins. Here’s a simple example of how to lay it out:
Intro: 0:00 to 0:15 seconds
Verse 1: 0:15 to 1:00
Chorus: 1:00 to 1:30
Verse 2: 1:30 to 2:15
Chorus: 2:15 to 2:45
Bridge: 2:45 to 3:00
Chorus/Outro: 3:00 to end
3. Creating Transitions
Transitions between sections are crucial for maintaining the flow of the track. You can create smooth transitions by:
Filters: Gradually applying a low-pass or high-pass filter can ease into a new section.
Reverse Sounds: Using a reversed cymbal or snare hit before a section starts builds anticipation.
Silence: Sometimes, a brief moment of silence before a drop or chorus can dramatically enhance the impact.
4. Varying the Instrumentation
To keep the arrangement interesting, vary the instrumentation in different sections:
Drops and Adds: Introduce new instruments in the chorus or remove elements in the verses to create dynamics.
Automation: Automate volume, panning, or effects throughout different sections to add movement and excitement.
5. Adding Vocal Cues (if applicable)
If you’re working with a vocalist or have vocal samples:
Verse: Ensure the beat in the verse sections is less busy to allow the vocal performance to shine.
Chorus: Make the beat fuller to match the energy of the hook.
Ad-libs and Effects: Place vocal ad-libs or effects like echoes to enhance certain parts of the track.
6. Refining Your Arrangement
Play through your arrangement multiple times, making adjustments as needed:
Loop Lengths: Adjust the length of loops to ensure the song progresses naturally.
Section Variations: Slight variations in drum patterns or melodies can prevent the track from becoming monotonous.
7. Final Checks
Ensure every transition is smooth and every section complements the next. The final arrangement should feel intentional and fluid, guiding the listener through a musical journey.
Step 7: Mix Your Track
Use Ableton’s mixer and effects to polish your beat. Adjust the levels of each track to ensure that no element is overpowering another. Use EQ to clean up the frequencies—cut the lows on non-bass sounds to make room for your kick and bass. Add some mild compression to the drum bus to glue the sounds together.
Step 8: Export Your Beat
Once you’re satisfied with your mix, export your beat. Go to File > Export Audio/Video, choose your desired format, and export your track. Now, your beat is ready to be shared with the world or used by a rapper to lay down vocals.
Conclusion
Creating a beat in Ableton Live as a beginner might seem daunting at first, but by breaking down the process into manageable steps, you can produce a compelling and professional-sounding track. Remember, the key to becoming proficient in beat-making is consistent practice and experimentation. Each project you work on will enhance your skills and refine your style.