
Beyond the Sonic Frontier: A Deep Dive into Ableton's Grain Delay Effect
Introduction
In the world of music production, the quest for unique and captivating sonic textures drives creative exploration. Ableton Live, a powerful and versatile Digital Audio Workstation (DAW), offers a treasure trove of audio effects to spark innovation. Among these gems, the Grain Delay effect stands as an extraordinary tool for music producers and sound designers. In this comprehensive guide, we'll delve into the intricacies of Ableton's Grain Delay, exploring its mechanisms, creative applications, and how it can be your key to crafting ethereal and otherworldly soundscapes.
Demystifying the Grain Delay Effect
Before we plunge into the realms of Ableton's Grain Delay, let's first grasp the fundamentals. Grain delay is a specialized audio processing technique that involves dividing an audio signal into tiny "grains" or fragments. These grains are then manipulated, rearranged, and reassembled to create unique and intricate soundscapes. The result is a lush, granular synthesis effect known for its ability to produce textures ranging from ambient drones to experimental glitches.
Ableton Live's Grain Delay effect provides an intuitive interface for granular processing, allowing producers to explore the rich potential of this technique. It can be used to transform a wide range of audio sources, from vocals and instruments to field recordings and synthesized soundscapes.
The Anatomy of Ableton's Grain Delay Effect

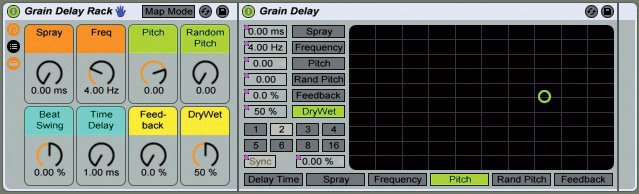
Let's take a closer look at the features and functionalities of Ableton's Grain Delay:
Position Control: The Position knob determines the starting point of the grains within the audio signal. By modulating this parameter, you can create evolving textures and rhythmic patterns.
Size Control: The Size knob controls the duration of each grain, impacting the texture and tonality of the effect. Smaller sizes produce more granular, high-pitched textures, while larger sizes yield smoother, ambient textures.
Pitch Control: The Pitch knob enables pitch modulation of the grains. This parameter can be used to create pitch-shifting effects or to add subtle pitch variations for more organic textures.
Frequency Control: The Frequency knob controls the rate at which grains are played, affecting the overall texture and tempo of the effect. Higher values result in faster playback, while lower values create slower, spacious textures.
Feedback Control: The Feedback knob determines the amount of feedback applied to the grains. Using feedback can produce evolving and complex textures but should be used cautiously to prevent excessive noise buildup.
Dry/Wet Mix: As with many audio effects, you can control the balance between the dry (original) and wet (effected) signals to fine-tune the intensity of the grain delay effect.
Creative Applications of Ableton's Grain Delay
The Grain Delay effect in Ableton Live offers a wide range of creative applications, giving you the power to shape soundscapes in novel and compelling ways:
Vocal Processing: Apply the Grain Delay effect to vocals to create ethereal harmonies, unique textures, and glitchy vocal effects. It's an excellent tool for sound designers and electronic music producers.
Instrument Enhancement: Transform instruments, such as guitars, synths, or pianos, into otherworldly soundscapes. Experiment with pitch and frequency modulation for innovative textures.
Ambient Soundscapes: Use the Grain Delay effect on field recordings or atmospheric soundscapes to generate evolving ambient textures, suitable for film scoring and experimental music.
Rhythmic Textures: By modulating the Position and Frequency parameters, you can create rhythmic textures that complement your drum tracks or add complexity to percussion elements.
Glitch and Stutter Effects: Combine Grain Delay with automation to produce glitchy, stuttering effects for an experimental edge in electronic music production.
Resampling and Layering: Resample the grain-delayed output and layer it with the original sound or other processed textures to create intricate soundscapes.

Grain Delay in Practice
Let's walk through a practical example of using Ableton's Grain Delay effect to enhance a vocal track:
Insert the Grain Delay Effect: Begin by inserting the Grain Delay effect on the vocal track you wish to process.
Position and Size Settings: Experiment with the Position and Size controls to find an interesting starting point and grain duration. Smaller sizes will create a more granular texture, while larger sizes will result in smoother sounds.
Pitch Modulation: If you want to add pitch modulation to the grains, adjust the Pitch parameter accordingly. This can create subtle pitch variations or drastic pitch-shifting effects.
Frequency and Feedback: Adjust the Frequency and Feedback parameters to control the rate of grain playback and the amount of feedback. These parameters can add complexity and movement to the texture.
Dry/Wet Mix: Carefully set the dry/wet mix to balance the original vocal with the grain-delayed sound. Find the right blend that complements your mix.
Automation: For more dynamic and evolving textures, consider automating parameters like Position, Size, and Frequency throughout your track.
Tips and Tricks for Using Grain Delay
To make the most of Ableton's Grain Delay effect, consider these additional tips and tricks:
Layering and Stacking: Experiment with layering multiple instances of Grain Delay with different settings to create rich, complex textures.
Creative Feedback: While feedback can be used for interesting textures, be cautious to prevent excessive noise buildup.
Harmonization: Apply Grain Delay to harmonized vocals to create unique and immersive vocal arrangements.
MIDI Control: Use MIDI control sources, such as an LFO or sequencer, to modulate Grain Delay parameters for evolving and animated textures.
Resampling Techniques: Resample the grain-delayed output and further process it with other effects to create entirely new soundscapes.
Presets and Defaults: Save your favorite Grain Delay settings as presets and consider making custom defaults to streamline your creative process.
Conclusion
Ableton's Grain Delay effect is a sonic playground for music producers and sound designers. It provides a gateway to crafting intricate textures, from lush ambient soundscapes to glitchy vocal effects and rhythmic enhancements. As you continue your musical journey, remember that the true magic of Grain Delay lies in your creativity and experimentation. So, let your imagination roam free and let Ableton's Grain Delay be your key to exploring the uncharted territories of sound.