
Acoustic Treatment on a Budget: A Guide for Home Studios
Creating a professional-sounding mix requires more than just great gear and software; it requires a properly treated acoustic environment. Acoustic treatment helps reduce unwanted reflections, standing waves, and flutter echoes, providing a more accurate listening environment. However, many home studio owners are deterred by the perceived high cost of acoustic treatment. Fortunately, it’s possible to achieve significant improvements in your room’s acoustics without breaking the bank. In this guide, we’ll explore various budget-friendly acoustic treatment solutions to help you get the most out of your home studio.

1. Understanding Acoustic Treatment Basics
Before diving into budget-friendly solutions, it’s important to understand the three main types of acoustic treatment:
Absorption: Absorbs sound waves to reduce reflections and reverberation. Common materials include foam panels, fiberglass, and rock wool.
Diffusion: Scatters sound waves to prevent them from bouncing back directly to the listening position, maintaining a natural ambiance.
Bass Traps: Specifically designed to absorb low-frequency sound waves, which are harder to control and often cause muddiness in the mix.
2. Identify Problem Areas
Every room has unique acoustic challenges. The first step in treating your space is identifying problem areas. Here’s how you can do it:
Clap Test: Clap your hands in different parts of the room and listen for flutter echoes or excessive reverberation. These indicate areas that need treatment.
Listen Critically: Play a variety of music and move around the room. Notice where certain frequencies seem too loud or too soft.
Use Measurement Tools: If possible, use a measurement microphone and software (e.g., REW - Room EQ Wizard) to analyze the frequency response of your room.

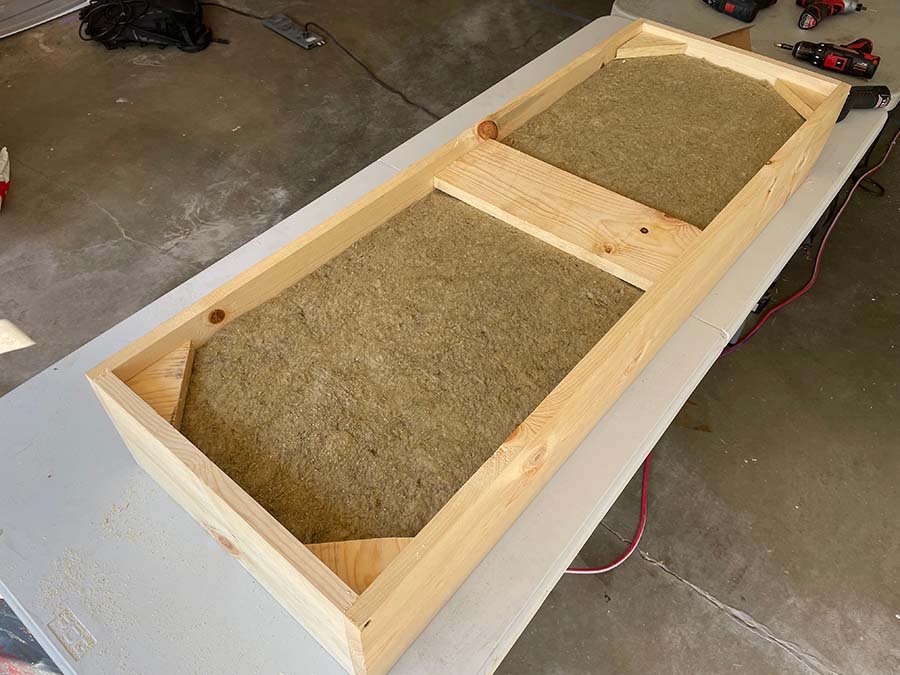
3. DIY Acoustic Panels
One of the most cost-effective ways to improve your room’s acoustics is to build your own acoustic panels. DIY panels can be just as effective as commercial ones, and they’re relatively easy to make.

Materials Needed:
Wooden frames (1x4 lumber works well)
Absorptive material (rock wool, fiberglass insulation, or acoustic foam)
Fabric (breathable fabric like burlap or muslin)
Spray adhesive
Staple gun
Steps to Build DIY Panels:
Build the Frame: Construct a rectangular frame using the wooden boards.
Insert the Absorptive Material: Cut the absorptive material to fit inside the frame and secure it using spray adhesive.
Wrap with Fabric: Wrap the entire frame with fabric, ensuring it’s taut. Use a staple gun to secure the fabric to the back of the frame.
Mount the Panels: Hang the panels on your walls, focusing on first reflection points (areas where sound first bounces off walls towards the listening position).
4. Affordable Bass Traps
Bass frequencies are particularly troublesome in small rooms. Bass traps help manage these low frequencies, preventing them from causing muddiness and resonances.
DIY Bass Traps: Similar to acoustic panels but thicker. Use thicker absorptive material (at least 4 inches) and place them in the corners of your room where bass tends to build up.
Foam Bass Traps: Affordable foam bass traps can be purchased online and installed in corners. While not as effective as thicker fiberglass or rock wool traps, they can still provide significant improvements.
5. Strategic Placement of Absorption
Proper placement of absorptive materials is crucial for effective acoustic treatment. Here’s where to focus:
First Reflection Points: These are the points where sound waves first reflect off the walls and ceiling before reaching your ears. Use a mirror to find these points: when you sit at your mixing position and can see the speakers’ reflections in the mirror, that’s a first reflection point. Place acoustic panels here.
Behind Speakers: Placing absorption directly behind your speakers can help reduce boundary interference and improve clarity.
Ceiling Cloud: Hanging a panel above the listening position can reduce ceiling reflections. This is especially important if your ceiling is low or reflective.
6. DIY Diffusers

Diffusion helps to scatter sound waves, reducing harsh reflections without removing energy from the room. DIY diffusers can be a cost-effective way to add diffusion to your room.
Skyline Diffusers: These are made from blocks of different heights arranged in a grid pattern. Use wood or dense foam to create these blocks.
Bookshelves: A full bookshelf can act as an effective diffuser. The irregular surfaces scatter sound waves and can enhance the acoustics of your room.
7. Use Everyday Items
You don’t always need specialized materials to improve your room’s acoustics. Everyday items can serve as effective acoustic treatments.
Thick Curtains and Rugs: Heavy curtains can help absorb sound, particularly high frequencies. Rugs or carpets can reduce reflections from the floor.
Furniture: Strategically placed furniture, such as sofas and bookshelves, can help break up sound waves and reduce reflections.
8. Acoustic Treatment on a Tight Budget
If your budget is extremely tight, here are a few more tips to improve your room’s acoustics with minimal spending:
Blankets and Mattresses: Hang blankets or place mattresses against walls to absorb sound. While not as effective as proper acoustic panels, they can still make a noticeable difference.
Egg Crate Foam: Though not as effective as professional acoustic foam, egg crate foam can be used for some high-frequency absorption. It’s inexpensive and better than bare walls.
Towels and Pillows: Lay towels on hard surfaces or stuff pillows in corners to help absorb sound.

9. Plan Your Upgrades
Acoustic treatment doesn’t have to be a one-time investment. Plan your upgrades gradually as your budget allows.
Start with Critical Areas: Focus on first reflection points and bass traps initially. These areas typically have the most impact on your listening environment.
Expand Gradually: As your budget allows, add more acoustic panels, bass traps, and diffusers to further enhance your room’s acoustics.

10. Test and Adjust
Acoustic treatment is an iterative process. Test your room’s acoustics after each change and make adjustments as needed.
Use Measurement Tools: Continue using measurement tools to analyze the impact of your treatments. Adjust placement and add additional treatments based on the results.
Critical Listening: Regularly listen to reference tracks in your treated room. Over time, you’ll develop a better understanding of how your room sounds and how to make further improvements.
Conclusion
Achieving a well-treated acoustic environment doesn’t have to be expensive. With some creativity and DIY spirit, you can significantly improve your home studio’s acoustics on a budget. Focus on identifying problem areas, building DIY panels, strategically placing absorptive and diffusive materials, and making use of everyday items. By following these tips, you can create a more accurate and enjoyable listening environment that enhances your music production process.